What happened to the Rishi Sunak I knew at school?
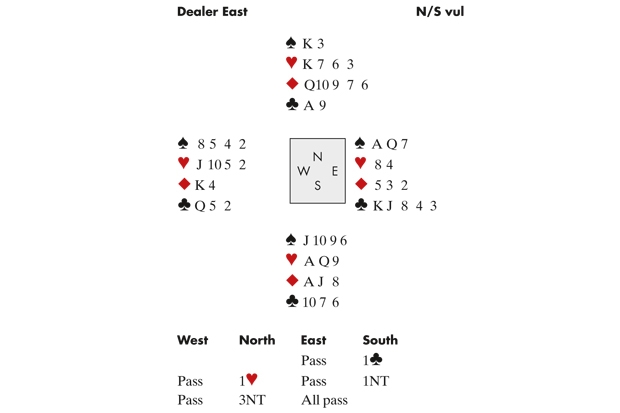
1♣ was prepared, and West’s choice of lead was the passive ♠5. Clearly, the defence have missed their best lead of a Club but the question was how to convince them to continue Spades, rather than finding the deadly switch.
First, Tom played the ♠King from dummy. Apart from looking like a panic-card, it has a chance of winning trick one, and he wouldn’t have to worry about a switch. Worryingly, East took the Ace, and pondered for a few seconds — the Club switch clearly on his mind — but he decided it was too risky. He cashed the ♠Queen instead and Tom followed with …what?
These decisions make all the difference at Pairs. The Jack won’t do, as East can see that partner would have led ♠10 from 10 9 8 5 4 2, and the ♠9 suffers the same fate. Tom followed with the ♠10 (and West with the 2), and as this was all consistent with West having led the 5 from J 9 8 5 4 2, East really had no option but to continue with another Spade.
+630 was worth 85 of the 94 match points available, while –200/300 would have been very poor indeed.


Comments
Join the debate for just $5 for 3 months
Be part of the conversation with other Spectator readers by getting your first three months for $5.
UNLOCK ACCESS Just $5 for 3 monthsAlready a subscriber? Log in